[转+译]乐高遥控潜水艇(乐高ROV)
在B站上看到的很有趣的一个视频,用到了乐高组件,PD控制和树莓派控制。
 Image credit: Brick Experiment
Youtube上的简介
这个潜水艇装配了压力传感器和激光距离传感器。这台机子还用到了树莓派和PID控制。测试地点包括泳池和河流。 This radio-controlled submarine can maintain a steady depth or a certain distance from the bottom. It is equipped with a pressure sensor and a laser distance sensor. Raspberry Pi and PID control are used for automation. Tested in a swimming pool and a small river (at the end of the video). Enjoy!
0:00 building
2:36 tests in water
3:48 long journey in a small river
6:47 full Python code
详细参数🧾/SPECS
排水量💧/Displacement: 2.4 kg (5.3 lb)
测试深度/Test depth: 1.5 m (5 ft)
外壳:透明亚克力管子(250x110x3mm)/Hull: acrylic plastic cylinder (250x110x3mm), SAN plastic lid (2mm thick)
盖子密封/Lid seal: o-ring 2.5 mm (NBR 70 shore)
压舱水容器:60 ml注射器,乐高EV3中号的电机/Ballast tank: 60 ml syringe (Eotia marinade injector), Lego EV3 Medium Servo motor (45503)
前进动力模块:无人机桨叶(diatone Bull Nose 4x4.5),乐高电机PF L-moter(88003)/Forward propeller: drone propeller (Diatone Bull Nose 4x4.5), Lego PF L-motor (88003)
转向模块:乐高桨叶(3浆),乐高电机PF L-moter(88003)/Turn propeller: Lego propeller 3 blade (6041), Lego PF M-motor (8883)
磁吸模块🧲:K&J铷磁D38-N52,:Magnetic couplings: K&J Magnetics D38-N52 neodymium magnet, TapeCase 423-5 UHMW Tape, silicon spray
Motor driver: 2x Pololu 2130 DRV8833 Dual H-bridge
遥控装置🎮:一个潜艇玩具上拆下来的控制器/Radio control: 27 MHz controller dissembled from a toy submarine (no-name chinese Mini U Boat)
压力传感器:Pressure sensor: Honeywell SSCMANV030PA2A3 2 bar
激光距离传感器:Laser distance sensor: SparkFun TFMini-S Micro
艇载电脑💻:树莓派Zero 2W/Computer: Raspberry Pi Zero 2 W
Power supply: Lego Rechargeable Battery Box 9V (8878), Pololu 2123 S7V8F5 5V voltage regulator 搭载相机:On-board camera: RunCam 5 Orange
CODE or DropBox CODE
PREVIOUS SUBS
细节文章参考
遥控潜艇4.0版本
RC Submarine 4.0 – blog post series
In this post series I will explain the making of a radio-controlled submarine. I will go through the design, the building process, Python code, tests in water, and all the mistakes I made. Lots of images included along the way.
This will be the fourth submarine I’ve built. I’m not an expert in submarines, just a hobbyist who builds all kinds of machines and shares the projects in a YouTube channel called the Brick Experiment Channel. The channel is dedicated to Lego Technic, so this submarine will also utilize Lego parts as much as possible.
Click to open the article where you want to start (preferably the first one):
RC Submarine 4.0 – background (1/10)
RC Submarine 4.0 – syringe ballast (2/10)
RC Submarine 4.0 – hull (3/10)
RC Submarine 4.0 – propellers (4/10)
RC Submarine 4.0 – pressure sensor (5/10)
RC Submarine 4.0 – laser distance sensor (6/10)
RC Submarine 4.0 – radio (7/10)
RC Submarine 4.0 – electronics (8/10)
RC Submarine 4.0 – PID control (9/10)
RC Submarine 4.0 – conclusion (10/10)
Here is the YouTube video I made of this project. The video contains only a scratch of the details I’m about to explain in this blog.
潜艇4.0 背景/RC Submarine 4.0 – background (1/10)
博主做了3个潜水艇。深度不稳定是前几个潜水艇的命门。This project began from a simple question: how to keep a submarine depth at a constant level? Unsteady depth had been a nuisance with the three submarines I made earlier, especially subs 1 and 3. Those submarines were always either at the bottom or at the surface. A good challenge to overcome.
PID控制可能可以解决这个问题。用树莓派Zero2作为船载电脑,根据压力传感器输入参数调整深度。I thought PID control might resolve the problem. I had some previous experience using PID with a Reaction Wheel Inverted Pendulum, so I knew the basics and had some parts already available, e.g. Raspberry Pi Zero 2. I could buy a pressure sensor and use that as an input for the controller. The whole idea that you could measure depth with a pressure sensor felt very intriguing.
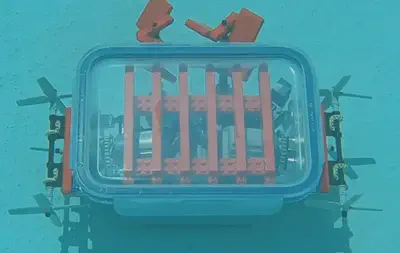
这次还想尝试用透明亚克力管子来做外壳,这样在水下游起来比较快。自己做盖子,这样的好处是可以用比较薄的材料。磁力传输系统就可以传输比较大的力矩。之前的潜艇用的磷酸铁锂电池来实现遥控,这一代抛弃,实现只有一块电池在潜水艇上。配重方面:之前咏是钢板或者是铅珠,这次使用钨珠,应该可以有效节省空间。There were other things I wanted to try. For the hull I would try a see-though acrylic plastic cylinder, which would be narrower than the previous hulls and therefore faster underwater. I would make the end caps myself, which would enable me to use very thin material, good for magnetic couplings to transfer a lot of torque. The previous subs had a separate Li-Po battery for radio control, which I wanted to get rid off and use only one battery onboard. Extra weight had been steel plates or lead pellets in previous subs, but now I wanted to try tungsten pellets to save space for other stuff. So, a lot of new things, that’s the way I like it.
如何保持深度 How to maintain depth?
I struggled with this question with my first submarine. What physical principle makes the submarine go to depth X? Then I realized, it doesn’t go to depth X automatically. You need to drive it there, the same way a car needs to be driven to position X by pressing the gas pedal and the brake pedal. The forces in a submarine are buoyancy and gravity. The depth is the result of these forces over time, following Newton’s second law. In mathematics, this would be a double integral: force / acceleration -> velocity -> position.
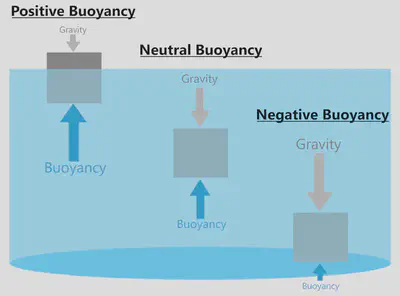
悬浮在水中需要浮力=重力。Buoyancy is an upward force caused by the surrounding liquid. It equals the weight of the liquid being displaced. If the submarine volume is 2400 ml, then the displacement is also 2400 ml. 2400 ml of water weighs about 2400 grams. To keep the submarine in neutral buoyancy, not moving up or down, the gravity should be equal to the buoyant force. In this example, the mass of the submarine, including the hull, motors, propellers, tungsten pellets and everything else, should be 2400 grams.
此处注意浮力不取决于深度。Note that the buoyant force does not depend on depth. If your submarine is 5 grams negatively buoyant, meaning it has slightly more mass than is being displaced, it will sink at the same downward force from surface to bottom. That assumes the submarine stays unaffected during the dive. If the submarine leaks, it’s mass will increase, which will make it sink faster. Or if the hull compresses under water pressure, it’s volume of displacement will decrease, which will again make it sink faster.
注意压力 Respect the force of pressure
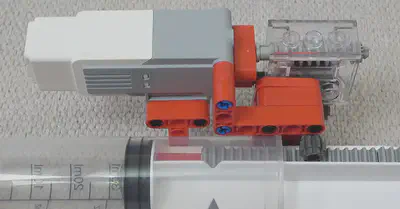
When you as a human dive in a swimming pool, you don’t feel the pressure. That’s why it is surprising how large it is. I had first hand experience of it with my Submarine 2.0 that had a soft plastic lid. I calculated that in 1.5 meters of depth, a normal swimming pool depth, the water pressure will press the lid with 35 kg force. That is like a frigging small human standing on it. No wonder it bent heavily. It resulted in a loss of buoyancy, which I measured to be 66 grams. That was enough to prevent the submarine from rising from the bottom, as the propellers didn’t have enough thrust force. The problem was finally fixed when I added red Lego beams under the lid to support it from bending.
图中盖子下方的红色横条是用来对抗水中压力的
如何控制深度 How to control depth
博主用了三种方法来控制深度。2.0版本中采用的桨叶的方式来控制潜水艇的上下。重力永远等于浮力,靠桨叶的输出来驱动潜艇。按照我的经验,这是最简单的一种方式。对于遥控你有最直接的响应。唯一的问题就是称重得非常精确,不然潜艇就会一直飘上飘下。 I’ve tried three methods for controlling the depth of a submarine. Submarine 2.0 had propellers pushing water up or down. In this method the submarine is weighed to be neutrally buoyant. Gravity and buoyancy stay always the same while the propellers exert force. In my experience this is the easiest to control. You get fast response to radio control buttons. You see the submarine immediately start moving up or down, and when you stop pressing the buttons, it will quickly slow to to a halt due to water resistance. Maybe the only problem I see is that the weighing has to be very accurate, otherwise the sub is always sliding up or down.
3.0版本的潜艇中搭载了一个空气压缩机和一个气球。空气到气球里面时,排水量增加,浮力增加。重力始终保持不变,改变浮力大小。根据我的经验,这是最难控制的。气球膨胀需要时间,特别是乐高的压缩机,效率不怎么高。而且由于压力的变化,气球气体体积带来的变化很不稳定。 Submarine 3.0 was equipped with an air compressor and a balloon. When the balloon is filled with compressed air, it will expand and displace more water, and thus increase buoyancy force. In this method, gravity stays always the same. In my experience this is the most difficult to control. It takes time to inflate the balloon, at least when using inefficient Lego compressors, and therefore the response time from radio control buttons to actual movement is long. Moreover, you’re always at a loss where the neutral buoyancy point is. You need to guess from the sub movement whether to inflate or deflate the balloon. Even worse, as the balloon air compresses under pressure, you’ll lose buoyancy as it goes deeper. 60 ml balloon will shrink to 52 ml at 1.5 m depth, so you’ve gone from neutrally buoyant to 8 grams negatively buoyant while diving to the swimming pool floor. This will make the depth position inherently unstable.
1.0版本中有一个活塞可以吸水进来,一个电机控制注射器,注射或吸收水到外界。这个方法中吸收水相当于增加了一部分重力。浮力一直保持一致。这个方法和上一个方法的缺点一样,响应的时间比较长,而且平衡的浮力位置比较难找到。 Submarine 1.0 had a piston ballast to suck water in. Here a motor moves a syringe, which has a hose connected to outside the hull, through which water will move into the syringe chamber. In this method the sucked-in water acts as an extra weight that will increase gravity. Buoyancy stays always the same. This has a lot of the same problems as the balloon method, having a poor response time to buttons and difficulty to know neutral buoyancy position for the syringe. In one respect this is better, as the syringe will not compress under pressure like the air balloon does, leading to better stability.
Submarine 1.0 has a syringe to suck water in. I’ll try to use syringe ballast for Submarine 4.0. 这次我沿用1.0版本的浮潜方法,一个原因,你可以测量活塞的位置用乐高EV3电机,这个乐高EV3点击有一个转速计tachometer。这就可以帮忙控制循环。这三个方法里最好的应该是2.0版本的,直接浮力=重力,用桨驱动。但是这样是没法设计的很流线型的。(而且我感觉比较费电)。 Why? For one reason, you can measure the piston position with an Lego EV3 motor that contains a tachometer. That will help the control loop. With an air balloon you would have to measure the deflation time, which would be less accurate. The best method out of the three would probably be propellers as in Submarine 2.0, but the hull shape would need to be less streamlined.
Ok, let’s start building.
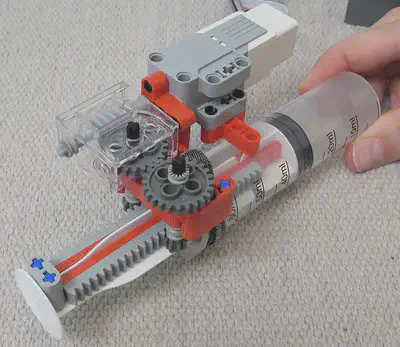
潜艇4.0-注射器压舱/RC Submarine 4.0 – syringe ballast (2/10)
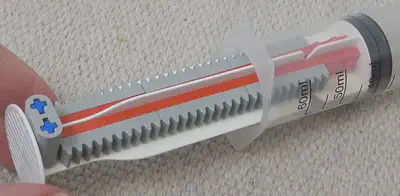
用1.0版本的注射器。到5米都没有问题。所以它能够保持0.5bar不变形。 The first thing to build is a piston ballast. I’ll use the same syringe I did in Submarine 1.0, since it worked very well. It didn’t even leak 5 meters under water, so it should handle at least 0.5 bar of pressure.
The syringe
我觉得普通的60ml注射器就行。 The syringe is a food syringe or marinade injector created by Eotia. It cost 4 euros in a Finnish hardware store, link: https://www.puuilo.fi/marinadiruisku-60-ml
The capacity is 60 ml. That should be enough based on my experiences with the first submarine. The hull volume will be roughly 2000 ml, so the syringe will have about 3% control range. Of course you would like to have more capacity to provide safety in case the hull leaks or compresses. Also, fine-tuning the extra weights to neutral buoyancy would be easier. But larger syringe also takes more space inside the hull, so it is a compromise.
实际上,1.0版本中只用到了60 ml中的25 ml。因为用的乐高的线性传动器(id:61927c01)。动力比较弱,长度比较小。只能维持0.3 bar。 Actually, Submarine 1.0 used only 25 ml of the available 60 ml capacity. That was because it was driven by a Lego linear actuator, part id 61927c01, which has a short range. The linear actuator is also weak, as it couldn’t empty the syringe in 5 meters under water. Max pressure for control was about 0.3 bar.
Syringe ballast from Submarine 1.0.
This time I want to try a different build, to get more range.
开始搭建🏠/Build
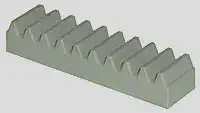
I put gear racks, Lego part id 3743, alongside the syringe rod. A little grey part to the end to help hold the rack lines in place.
The biggest problem was to push gears hard enough against the racks so they won’t skip. I put two 8-tooth gears (10928) to push the rod from both sides, therefore supporting each other. They would also help to hold the gear racks in place. Luckily all dimensions were good so all parts fit very tightly.
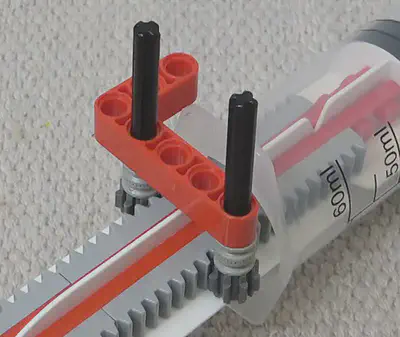
Then I used one of the syringe handles to hold the gears in place lengthwise, to the direction of the rod. This required a lot of trial-and-error until I found a Lego part combination that wouldn’t break.
Lastly, I needed to gear down to provide enough torque. Lego gearbox, part id 6588, has a 24:1 gear reduction. It needs a worm gear (4716) and a 24-tooth gear (3648) to work. Besides increasing torque 24-fold, minus friction, it is very compact, perfect for a submarine.
The Lego motor I selected was EV3 Medium motor, because it has a tachometer inside that I can use to keep track of the syringe position.
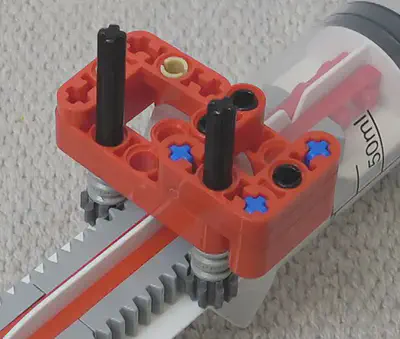
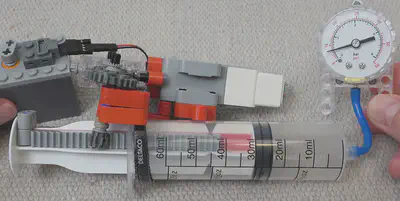
I tested the construct for max pressure using a Lego manometer (64065). At first Lego parts slipped out of the handle when pressure increased to 0.3 bar. I put a Deltaco Velcro Strap around to pull the syringe and Lego parts together. That increased the max pressure to 0.5 bar. Beyond that I didn’t try, as parts started to bend dangerously, as you see from the image below. I did multiple tests to verify that it should work under 0.5 bar, which equals 5 meters of depth. But to be safe, I decided to limit the submarine depth to 4 meters.
注射器的速度是2.7 ml/sec。这个速度不是很快,但是对于PID控制来说足够了,16秒可以从3 ml到45 ml。The syringe speed is 2.7 ml/sec. Not very fast. Moving from min to max position (3 to 45 ml) takes 16 seconds. This will make the submarine react slowly to depth control changes. But as it turns out, it is enough for PID control.
So, the construct provides enough force. Actually too much. I had to be careful not to let the syringe run to the end, because it would probably break teeth from the gears. That was a problem. I briefly tried to replace 24-tooth gears with Lego clutches (60c01) that are designed to limit torque, but then the max pressure dropped to 0.17 bar. No good.
How to save the gears from destroying themselves? I resorted to tachometer data. I’ll read tachometer pulses and put limits to code on how the syringe is controlled. That was a source of annoyance further down the road, as Raspberry would not always catch tachometer pulses. Therefore I had to routinely check the syringe position data and tune it.
Wirings
Lego EV3 Medium motor is connected to Raspberry using a Lego EV3 cable. I cut one EV3 cable and crimped female DuPond connectors to the end.
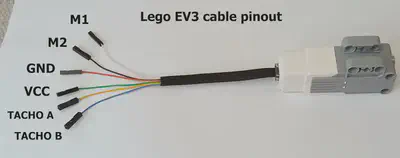
Lego EV3 cable with DuPond connectors attached to the end.
The cable has 6 wires. M1 and M2 are for driving the motor. TACHO A and TACHO B for reading the tachometer pulses. GND and VCC are used to power the tachometers.
You should supply VCC with 5V according to the specs, but that is not an option, as the tacho pulses would have too high voltage for Raspberry to read them directly. Therefore I’ll supply VCC with 3.3V. I’ve used that setup previously with my Reaction Wheel Inverted Pendulum, and it works. I also have checked that the current draw from VCC is 6.5 mA, which is small enough for Raspberry.
代码/Code
Then I wrote a Python code to read the tachometers. There are two tachometer signals and you know the direction of rotation based on which signal goes to 1 first. The code looks more complex than it should be, but that is because it provides the most reliability. E.g. you can’t read tachoA.value in the signal handler, because by the time that code is executed, the value has already changed. I tested multiple implementations with my Inverted Pendulum. As a side note, you could improve reliability by doing sleeps in the main control loop in small increments. I guess the rising/falling edge detection needs the CPU to be idle or something.
tachoPower = DigitalOutputDevice(20)
tachoA = DigitalInputDevice(16)
tachoB = DigitalInputDevice(19)

tachoAValue = tachoA.value
tachoBValue = tachoB.value
def tachoA_rising():
    global tachoCount
    global tachoAValue
    global tachoBValue
    tachoAValue = 1
    if tachoBValue == 0:
        #A in rising edge and B in low value
        #  => direction is clockwise (shaft end perspective)
        tachoCount += 1
    else:
        tachoCount -= 1
def tachoA_falling():
    global tachoAValue
    tachoAValue = 0
def tachoB_rising():
    global tachoCount
    global tachoAValue
    global tachoBValue
    tachoBValue = 1
    if tachoAValue == 0:
        tachoCount -= 1
    else:
        tachoCount += 1
def tachoB_falling():
    global tachoBValue
    tachoBValue = 0

tachoA.when_activated   = tachoA_rising
tachoA.when_deactivated = tachoA_falling
tachoB.when_activated   = tachoB_rising
tachoB.when_deactivated = tachoB_falling

tachoPower.value = 1
Syringe position is calculated from the tacho count. I included hysteresis calculation into the code to compensate for gear backlash and such things.
Syringe range was set to be between 3 ml and 45 ml. Minimum was 3 to provide some safety from hitting the end, and max was 45 because the hull doesn’t have more room.
SYRINGE_POS_MIN     = 3     #syringe ballast min pos [ml]
SYRINGE_POS_MAX     = 45    #syringe ballast max pos [ml]
SYRINGE_TACHO_COUNT = 19000 #tacho count from syringe min to max pos
SYRINGE_HYSTERESIS  = 360   #motor+gearbox+syringe backlash/hysteresis [tacho counts]

#calculate syringe position
if tachoCount > trueTachoCount:
    trueTachoCount = tachoCount
elif tachoCount < trueTachoCount - SYRINGE_HYSTERESIS:
    trueTachoCount = tachoCount + SYRINGE_HYSTERESIS
syringePos = SYRINGE_POS_MIN + SYRINGE_POS_MAX * \
             trueTachoCount / SYRINGE_TACHO_COUNT  #[ml]
I need to store the syringe position in flash, so that it is not lost during shutdown.
import configparser

#read config file
configFile = open("submarine_4.ini", "r+")
config = configparser.ConfigParser()
config.read_file(configFile)
tachoCount = int(config['default']['tachoCount'])

storedTachoCount = tachoCount
def writeConfigFile():
    global configFile
    global config
    global tachoCount
    global storedTachoCount
    if tachoCount != storedTachoCount:
        storedTachoCount = tachoCount
        config['default'] = {}
        config['default']['tachoCount'] = str(tachoCount)
        configFile.seek(0)
        config.write(configFile)
        configFile.truncate()
Here are the syringe motor output pins.
#prepare motor drivers
motorDive = DigitalOutputDevice(13)
motorSurface = DigitalOutputDevice(12)
Here is code for driving the motor. syringeMotorCtrl is the PID output. If syringe position is out of limits, the motor is not driven.
#syringe range limitations
if syringePos <= SYRINGE_POS_MIN and syringeMotorCtrl < 0:
    syringeMotorCtrl = 0
if syringePos >= SYRINGE_POS_MAX and syringeMotorCtrl > 0:
    syringeMotorCtrl = 0

#drive syringe motor
motorDive.value = (syringeMotorCtrl > 0)
motorSurface.value = (syringeMotorCtrl < 0)
I also added a deadband limit to reduce motor wear, as the PID output is noisy. More of that when testing PID.
Tests
Here is the syringe position data from a typical swimming pool test run. The submarine dives to the bottom, drives around, and comes back up. PID control is in use.
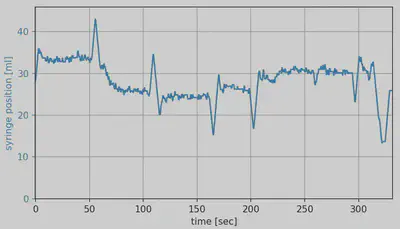
As you see, the active range for operation is about 25 ml. That is about half of the syringe size. Therefore the syringe is large enough for control.
In the 10+ hours of testing the submarine, the syringe worked physically well. I never noticed any leaks. Then again, it was tested only at a max depth of 1.5 meter.
Two times the range limitation failed and the syringe ran against the end. The first time the tacho count was wrong after a long test run. The second time I had made a change to the code that crashed it, leaving the syringe motor on. No teeth was broken in either case, but the gears slipped out of the gear rack and I had to install them again. The fact that Raspberry failed to catch tacho pulses and the actual syringe position would be lost in time, is the biggest complaint I can see with the syringe. It was annoying to need to check the position data and tune it between test runs.
The finished syringe unit.
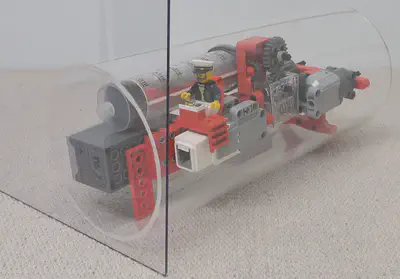
潜艇4.0-外壳/RC Submarine 4.0 – hull (3/10)
前几个版本的潜艇,我用了宜家的密封食盒和一个储水罐作为外壳。两个都不错,特别是宜家的密封食盒,盖子很牢靠,很易用。但是这次我想尝试点不一样的。In previous submarines I used IKEA glass food containers and a plastic lemonade pitcher as hulls. Both worked ok, especially the IKEA snap-on lids were easy to use. But this time I wanted to try something different.
设计Design
外壳要比较坚固牢靠。不会因为压力太大就散架了,或者被压扁了,否则就会损失压力。像2.0版本的软盖子就不行。The hull has to be rigid. It cannot bend or compress under pressure, otherwise I’ll lose buoyancy, like with the Submarine 2.0 soft lids.
外壳需要是透明的。It needs to be transparent. I couldn’t even imagine building the thing, solving problems and checking everything is ok before dive if I couldn’t see inside.
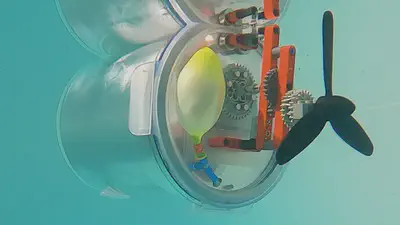
尽量是流线型的。尽可能窄,这样前进的速度就会比较快。前端想装个摄像头,所以前端最好是平的。后端也得是平的,才能装上磁力的动力装置。It is good to be streamlined. As narrow as possible to increase movement speed. But also, I want an on-board camera to the front, so the front has to be flat. The back also needs to be flat for the large magnetic couplings I’m going to use. Not optimal for speed, but fast enough in hindsight.
所以外壳要是两头平的圆柱体。 So, I decided to make a cylinder with flat ends. Plain and simple.
最小直径是多少?主螺旋桨的磁吸配对需要4厘米。左右螺旋桨需要2.5厘米。外壳的厚度是3mm。本来以为10cm差不多。后来加到11cm。 What is the minimum diameter? Magnetic coupling for the main propeller will take 4 cm, as I intend to base it on a 40-tooth Lego gear, like in previous subs. For left/right turn I first envisioned using a linear magnetic coupling, similar to Submarine 3.0, but in the end I changed it to a 24-tooth magnetic coupling. That will take 2.5 cm. Some clearance is needed between the magnets. For the lid sealing I will use a piece of a smaller cylinder that is attached to the flat lid. The lid sealing takes 2 mm and the hull thickness is 3 mm. With this information I draw a sketch with 10 cm outer diameter. In this drawing everything would fit but with little room for error. Therefore I increased the diameter to 11 cm, just to be on the safe side.
最小长度是多少?整支注射器得要23cm。连接到注射器的管子也需要一些空间。所以总的25cm What is the minimum length? The syringe takes 23 cm when fully extended. The hose connection to the syringe will take some space also, so a total of 25 cm, a good round number. I was able to find a 25 cm length cylinder. In the end, the hull was a tad too short for the syringe. It extended only 45 ml out of 60 ml, as it would hit the lid supports. Well, good enough.
亚克力管子外壳/Acrylic plastic cylinder
我用到的是两种亚克力管子:外径是11cm的和外径是10cm的。长度25cm,厚度是3mm。10cm的是用来做盖子的内衬的。I bought two Perspex acrylic plastic cylinders: 11 cm and 10 cm in outer diameter, length 25 cm for both, thickness 3 mm for both.
SAN材料板/SAN plastic sheet
苯乙烯丙烯腈。这个材料2mm厚,30x30cm的尺寸。我觉得我们用亚克力也可以。I bought a plastic sheet made of styrene-acrylonitrile, also known as SAN. Thickness 2 mm thick and size 30×30 cm. It cost 5 euros in a finnish hardware store Biltema, link: 亚克力板-可加工
盖子尽量越薄越好。越薄就意味这越大的扭力。这个刚性还行。 裁切我觉得可以交给工厂。 I wanted the lid thickness to be as small as possible for magnetic couplings. Less gap means more torque. But of course it shouldn’t bend or break. The 2 mm sheet felt rigid enough in my hands when I tried it before buying.
粘上盖子/Gluing plastics
测试了四种胶。热熔胶、硅胶、塑料胶、502.I’ll need to glue SAN plastic to acrylic plastic. How do you do that? The bond needs to be watertight and unbreakable.
I decided to perform a little test with four glues:
- hot glue
- Biltema silicone (a cheap brand)
- Bison plastic adhesive
- Gorilla super glue
这里只展示结论。502最好。502在沾上之后会形成一些蒸汽,如果通风不够,那么很容易形成雾状沉淀在盖子周围。但也可以用抛光颗粒解决这个问题。
密封/Sealing
接下来就是密封。刚开始的状态是这样的。外壳和盖子中间有2mm的空隙。The next thing was to seal it watertight. Here is an image of the starting point. Between the lid cylinder and the hull cylinder there is a 2 mm gap.
用o-ring。买了2m长的2.5mm的NBR橡胶。70束,70束相对来说偏硬,我更喜欢软一点的材料,但是找不到。
I measured the o-ring length. I read it should be 0-5% shorter than needed, to give it a small stretch. But I had trouble installing that, so I cut it 15% shorter. 2.5 mm is a bit too thick for 2 mm gap, so stretching will make it thinner and easier to install.
Dr. Hui Lin (林辉)
Assistant Researcher
My research interests include Dissolved Organic Matter (DOM) in natural waters, marine chemistry using isotope methodology and freshwater sciences.